
We took a break from working on the basement during the holidays, but we are back on getting the mudroom wall finished up.
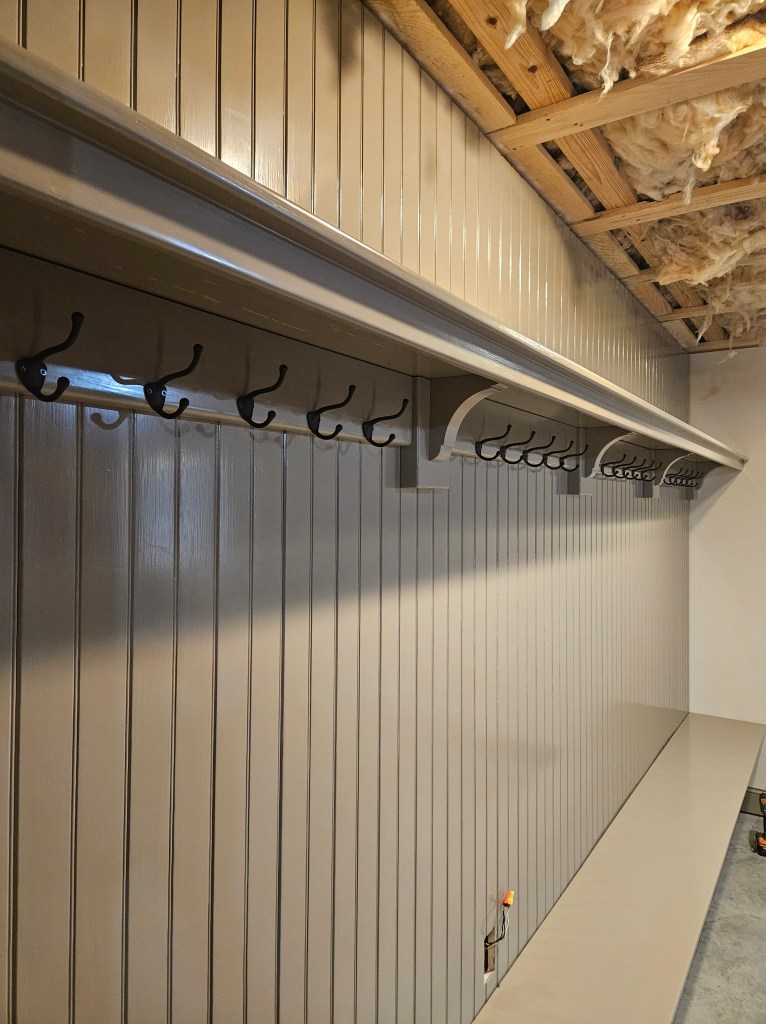
I bought 20 oiled bronze finish brass coat hooks from Van Dyke’s. They aren’t very tall which is good because there isn’t much room in that direction. There are 5 hooks between each pair of brackets, so in order to figure out the placement, I started by finding the center point–17″. (I used wide painters tape to make all the markings.) I divided 17 by 3 to determine the general placement of the two hooks on either side of the center points–which came out to approximately 5 5/8″. I measured out from the center point to ensure that things looked even to the eye. It’s not exact, but you can’t see it–you’d have to measure it to see that it’s not perfect.

My husband made a little fixture to make all the little screw holes for the coat hooks. He drilled all the holes and then installed the coat hooks. Then we took a break for dinner–homemade tamales and Mexican rice. The board that the coat hooks are mounted to is only held in place by the finish nails we used to install it, which isn’t strong enough to support any weight on the coat hooks. So, my husband took each coat hook down and hid a finish screw behind them to ensure that it was sturdy enough to support the weight of coats and bags.
The next step is to secure the shelf to the brackets and the bench to the brackets. For the shelf board, we are going to screw through the shelf into the brackets because no one will see the screws. For the bench, we are going to mount L brackets to the trim board under the bench and then to the bench so that my husband doesn’t have to try to drive a screw through the bracket from underneath at a really awkward angle. We thought about going through the bench into the brackets, but that would require patching, sanding, and painting the screw holes on the top of the bench. Holding the bench in place isn’t going to need much because gravity is doing most of the work for us, so the L bracket solution is the lowest risk option–and you won’t see them unless you get down on the floor.
In other news, we are finalizing our flooring choices. For most of the space, we’re using a Marmoleum Dark Bistre in 12 x 12 squares (we think). I have ordered a box of them to see how we feel with real tiles since the sample is only a 3 x 3 inch square. We’re using a hexagonal mosaic for the bathroom with medium green, dark green, yellow and white with a border of black and white and green. And we’re going to use Fireclay ceramic tiles in Sunflower (yellow), Clover (medium green) and Sandstone (tan–very close to the trim color) in an interesting pattern in the kitchenette/bar. I’m thinking about doing a more interesting border to delineate the space, but we’ll see how expensive that is.
Our next steps are:
- Noting all the electrical elements that need to be added to the living room side of the basement and hire an electrician to install them.
- Once all the electrical is finished, we can install the ceiling and the can lights. This will make a HUGE difference in the room. We’re using Hardie Bead Board painted Damask Silk like the walls for the ceiling.
- Finish sand the closet doors and spray them with lacquer. We’re using a light tough on all of this because I love how the doors look at this stage and I don’t want them to lose their patina.
- Put the hardware on the doors. I got rim lock hardware–mounted on the face of the door. We are concerned that the knob assembly doesn’t have enough adjustment for how thin the doors are (about an inch). I think that I am going to order rim locks meant for screen doors in a bronze color, because we’ll need the rim locks that we already have for some of the other doors that we have to install.
- My husband helped saw a BUNCH of poplar into blanks for mouldings. So, he also ordered a shaper and cutters to make all the baseboard, and window/door casings. It’s supposed to arrive next week. So, we’ll have to make the door casings for the closets and then a little trim piece to hide the block wall on the left edge of the left door by the stove. Then sand, prime, and paint them and then install them. There are a few molding pieces that we need to make for the mudroom wall that we’ll do at the same time. We won’t worry about baseboard or window casings for now since there are some. We’ll replace it when we crank up to make those for the rest of the basement.
Once all of that is finished, we’ll be at a stopping point in the living room and we’ll move on the stairs (new lights, custom iron railing, quartersawn white oak risers and treads, and painted trim along the stairs and new door casing.
Then on to my husband’s office and a storage room. Those will take longer because they are whole rooms that are currently unfinished.

You just keep on keeping on. Very good.
LikeLiked by 1 person